Making macros user-friendly : Providing dialog boxes for macros : Setting up dialog boxes
|
|
| Making macros user-friendly : Providing dialog boxes for macros : Setting up dialog boxes |
The Form Designer in the Macro Editor provides easy access to the tools for setting up a dialog box.
You can access the Form Designer by creating a new, blank dialog box. In the Project Explorer, right-click the project to which you want to add a dialog box, and then click Insert } UserForm.
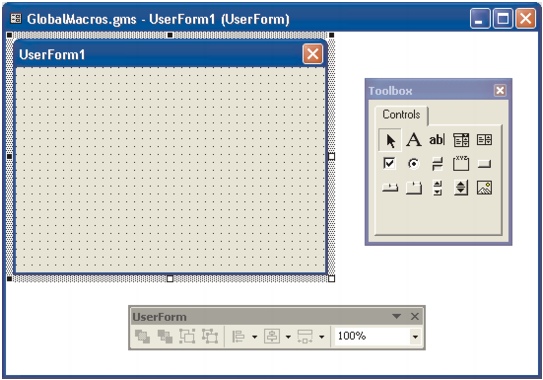
A blank form in the Form Designer
The Form Designer provides two main features for designing dialog boxes:
• |
the Form Designer toolbox
|
• |
The UserForm toolbar
|
The Form Designer also provides functions for naming and testing dialog boxes.
The Form Designer toolbox is the main utility for designing dialog boxes. It lets you add controls to a dialog box by dragging them from the toolbox.

The Form Designer toolbox
The Form Designer toolbox lets you add the following controls to a dialog box:
|
Icon
|
Control name
|
Function
|
|---|---|---|
| |
Label
|
Provides static text, such as instructions or captions |
| |
TextBox
|
Provides an area for typing text. For information on coding this control, see Providing text boxes in dialog boxes. |
| |
ComboBox
|
Provides a list from which a single item can be selected; optionally, also provides an area for typing text. For information on coding this control, see Providing combination boxes and list boxes in dialog boxes. |
| |
ListBox
|
Provides a list from which multiple items can be selected. For information on coding this control, see Providing combination boxes and list boxes in dialog boxes. |
| |
CheckBox
|
Provides a check box that can be enabled (by clicking to display a check mark), disabled (by clicking to remove the check mark), or grayed (that is, made unavailable) |
| |
OptionButton
|
Provides a “radio button” that is linked to other radio buttons with the same GroupName property, such that only one of the buttons can be enabled at a time |
| |
ToggleButton
|
Provides a button that can be toggled (to appear pressed or not pressed) |
| |
Frame
|
Groups items together so that they move with the frame |
| |
CommandButton
|
Provides a button that can be clicked to commit an assigned action. For information on coding this control, see Providing buttons in dialog boxes. |
| |
TabStrip
|
Provides separate views of related controls |
| |
MultiPage
|
Provides multiple pages of controls |
| |
ScrollBar
|
Provides immediate access to a range of values by scrolling |
| |
SpinButton
|
Enhances another control (such as a TextBox control) so that the value for that control can be set more quickly |
| |
Image
|
Provides an image. For information on coding this control, see Providing images in dialog boxes. |
![]()
• |
The Form Designer toolbox also features a Pick tool |
![]()
• |
To display a Help topic containing information about a selected dialog-box control in the Form Designer,
press F1.
|
The Form Designer also provides access to the UserForm toolbar, which you can use when designing a dialog box. For information on this toolbar, see Using the Macro Editor toolbars.
After you have finished designing your dialog box, you may want to change its title. Click the dialog box to select it, and then in the Properties window, change the Caption property.
![]()
• |
For clarity, you can give each dialog box a unique, descriptive name by using the Properties window.
However, remember to follow the standard programming conventions for naming variables.
|
At any time, you can test your dialog box by pressing F5 to run it.
After you finish setting up your dialog box, you can start coding it. For information, see Coding dialog boxes.
|
|
|
|
Copyright 2013 Corel Corporation. All rights reserved.