Making macros user-friendly : Providing dialog boxes for macros : Coding dialog boxes
|
|
| Making macros user-friendly : Providing dialog boxes for macros : Coding dialog boxes |
After setting up a dialog box, you can develop the VBA code for displaying it. You can also develop the code for providing its text boxes, combination boxes and list boxes, buttons, and images.
The Show method for a dialog box lets you determine how the dialog box is displayed.
For example, the following code uses the Show method to display the dialog box frmFooForm:
frmFooForm.Show |
In addition, the Show method provides a Modal parameter, which lets you specify whether the dialog box is modal or modeless. A value of vbModal (or 1) for this parameter creates a modal dialog box, while a value of vbModeless (or 0) creates a modeless dialog box. The following VBA example creates a modeless dialog box:
frmFooForm.Show vbModeless |
To open a dialog box from a macro that is available from within the application itself, you must create a public subroutine within a code module. However, a subroutine cannot be made available from within the application if the subroutine exists either within the code for a dialog box or within a class module. In addition, the subroutine cannot take any parameters.
The following VBA example subroutine opens frmFooForm as a modeless dialog box:
Public Sub showFooForm() |
frmFooForm.Show vbModeless |
End Sub |
![]()
• |
When a dialog box loads, it triggers its own UserForm_Initialize event. From this event handler, you
must initialize all the relevant controls on the dialog box. For more information, see Providing event
handlers.
|
Finally, you can also use the Show method to open additional dialog boxes from within the current one, as in the following VBA example:
UserForm2.Show vbModal |
However, control is not returned to you until all open dialog boxes are unloaded.
Text boxes (that is, TextBox controls) are the mainstay of user input. They are simple to use and quick to program, and they are suitable for a number of purposes.
To set the text in a text box when initializing it, set the Text (default or implicit) property for the TextBox control, as in the following VBA example:
txtWidth.Text = "3" |
txtHeight = "1" |
To get the value of a TextBox control, get its Text property in the Properties window, as in the following VBA example:
Call SetSize(txtWidth.Text, txtHeight.Text) |
In a combination box (that is, a ComboBox control), the user can either choose an item from the list or type a value into the text box. You can prevent users from being able to type into a ComboBox control by setting its Style property (in the Properties window) to fmStyleDropDownList.
In a list box (that is, a ListBox control), the user can choose one or more items (typically, from between three and ten items) from the list.
To populate a list of any type, you must call the member function AddItem for the list. This function takes two parameters: the string or numerical value, and the position in the list. The position parameter is optional, so omitting it inserts the item at the last position in the list. For example, the following VBA code populates the list ComboBox1 with four items:
ComboBox1.AddItem 1 |
ComboBox1.AddItem 2 |
ComboBox1.AddItem 3 |
ComboBox1.AddItem 0, 0 |
To test which item is selected when the OK button is clicked, test the ListIndex property for the list.
To get the value of the caption for a selected combination box or list box, test the Text property for the item, as in the following VBA example:
Dim retList As String |
retList = ComboBox1.Text |
You can add a button to a dialog box by using the CommandButton control. Click the dialog box to add a default-sized button, or drag to create a custom-sized one. Click the caption to edit it, or select the button and edit its Caption property in the Properties window. You might also want to change the name of the button to something more descriptive, such as buttonOK or buttonCancel.
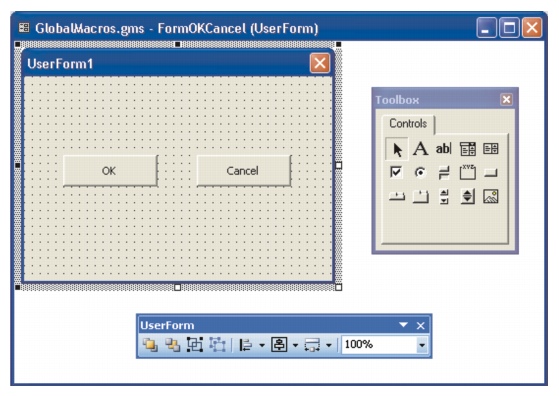
Designing buttons in the Form Designer
Most dialog boxes have an OK button and a Cancel button. However, no button functions until its dialog box has code for handling the click event for the button. (This is because dialog boxes in VBA and VSTA are event-driven.)
For an OK button, you can set its Default property to True so that the event handler for the button is called when the user presses Enter to activate the dialog box. That way, the click-event handler for the button performs the functionality of the dialog box and then unloads that dialog box.
If the dialog box is used to set the size of the selected shapes by setting their width and height, then the click-event handler for the OK button could resemble the following VBA code sample (which assumes you have already created two text boxes called txtWidth and txtHeight):
Private Sub buttonOK_Click() |
Me.Hide |
Call SetSize(txtWidth.Text, txtHeight.Text) |
Unload Me |
End Sub |
Similarly, the size-setting subroutine could resemble the following:
Private Sub SetSize(width As String, height As String) |
ActiveDocument.Unit = cdrInch |
ActiveSelection.SetSize CDbl(width), CDbl(height) |
End Sub |
From inside the code module for the dialog box, the dialog-box object is implicit, so all the controls can be simply accessed by name. From other modules, the controls must be accessed through their full name (as in UserForm1.buttonOK).
The Cancel button is the simplest control: it must dismiss the form without doing anything else. To add a cancel action to a Cancel button, double-click the button from within the Form Designer to display its code in the Code window. This creates a new subroutine called cmdCancel_Click:
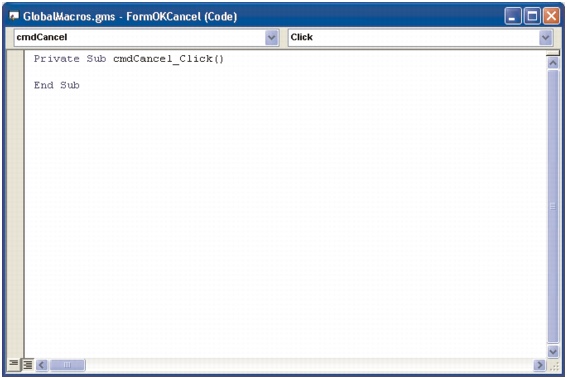
The Code window with code for a Cancel button
The following VBA code, if applied to a Cancel button, dismisses the dialog box when the button is clicked:
Private Sub cmdCancel_Click() |
Unload Me |
End Sub |
If you continue by setting the Cancel property for the dialog box to True, then when the user presses Escape, the cmdCancel_Click event is triggered and the provided code unloads the form.
The Image control is used to place graphics on a dialog box. The image (a bitmap) is contained in the Picture property, so you can either load an RGB image from a file (such as a GIF, JPEG, or Windows Bitmap BMP file) or paste one into the property.
At run time, you can change the Picture property if you want to load a new image into the Image control. To change the Picture property, use the function LoadPicture and provide a path to the new image file, as in the following VBA example:
Image1.Picture = LoadPicture("C:\Images\NewImage.gif") |
|
|
|
|
Copyright 2013 Corel Corporation. All rights reserved.